| | |
|---|
| | | # Yolo-v3 and Yolo-v2 for Windows and Linux |
|---|
| | | ### (neural network for object detection) |
|---|
| | | # Magic: The Gathering Card Detector |
|---|
| | | |
|---|
| | | [](https://circleci.com/gh/AlexeyAB/darknet) |
|---|
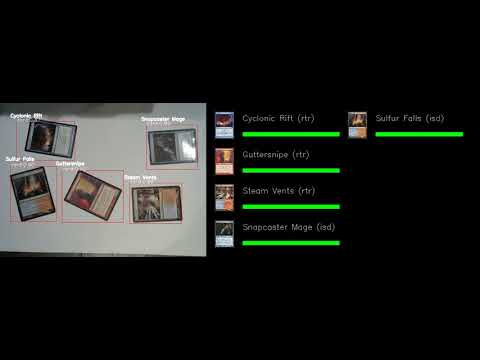
| | | MTG Card Detector is a real-time application that can identify Magic: The Gathering playing cards from either an image or a video. It utilizes various computer vision techniques to process the input image, and uses [perceptual hashing](https://jenssegers.com/61/perceptual-image-hashes) to identify the detected image of the cards with the matching cards from the database of MTG cards. Refer to [opencv_dnn.py](https://github.com/hj3yoo/mtg_card_detector/blob/master/opencv_dnn.py) for more detailed implementation. |
|---|
| | | |
|---|
| | | 1. [How to use](#how-to-use) |
|---|
| | | 2. [How to compile on Linux](#how-to-compile-on-linux) |
|---|
| | | 3. [How to compile on Windows](#how-to-compile-on-windows) |
|---|
| | | 4. [How to train (Pascal VOC Data)](#how-to-train-pascal-voc-data) |
|---|
| | | 5. [How to train (to detect your custom objects)](#how-to-train-to-detect-your-custom-objects) |
|---|
| | | 6. [When should I stop training](#when-should-i-stop-training) |
|---|
| | | 7. [How to calculate mAP on PascalVOC 2007](#how-to-calculate-map-on-pascalvoc-2007) |
|---|
| | | 8. [How to improve object detection](#how-to-improve-object-detection) |
|---|
| | | 9. [How to mark bounded boxes of objects and create annotation files](#how-to-mark-bounded-boxes-of-objects-and-create-annotation-files) |
|---|
| | | 10. [Using Yolo9000](#using-yolo9000) |
|---|
| | | 11. [How to use Yolo as DLL](#how-to-use-yolo-as-dll) |
|---|
| | | **Demo:** |
|---|
| | | |
|---|
| | | [](https://www.youtube.com/watch?v=BZkRZDyhMRE "Demo #1") |
|---|
| | | |
|---|
| | | |
|---|
| | | |  |  mAP (AP50) https://pjreddie.com/media/files/papers/YOLOv3.pdf | |
|---|
| | | |---|---| |
|---|
| | | |
|---|
| | | * Yolo v3 source chart for the RetinaNet on MS COCO got from Table 1 (e): https://arxiv.org/pdf/1708.02002.pdf |
|---|
| | | * Yolo v2 on Pascal VOC 2007: https://hsto.org/files/a24/21e/068/a2421e0689fb43f08584de9d44c2215f.jpg |
|---|
| | | * Yolo v2 on Pascal VOC 2012 (comp4): https://hsto.org/files/3a6/fdf/b53/3a6fdfb533f34cee9b52bdd9bb0b19d9.jpg |
|---|
| | | |
|---|
| | | |
|---|
| | | # "You Only Look Once: Unified, Real-Time Object Detection (versions 2 & 3)" |
|---|
| | | A Yolo cross-platform Windows and Linux version (for object detection). Contributtors: https://github.com/pjreddie/darknet/graphs/contributors |
|---|
| | | |
|---|
| | | This repository is forked from Linux-version: https://github.com/pjreddie/darknet |
|---|
| | | |
|---|
| | | More details: http://pjreddie.com/darknet/yolo/ |
|---|
| | | |
|---|
| | | This repository supports: |
|---|
| | | |
|---|
| | | * both Windows and Linux |
|---|
| | | * both OpenCV 2.x.x and OpenCV <= 3.4.0 (3.4.1 and higher isn't supported) |
|---|
| | | * both cuDNN v5-v7 |
|---|
| | | * CUDA >= 7.5 |
|---|
| | | * also create SO-library on Linux and DLL-library on Windows |
|---|
| | | |
|---|
| | | ##### Requires: |
|---|
| | | * **Linux GCC>=4.9 or Windows MS Visual Studio 2015 (v140)**: https://go.microsoft.com/fwlink/?LinkId=532606&clcid=0x409 (or offline [ISO image](https://go.microsoft.com/fwlink/?LinkId=615448&clcid=0x409)) |
|---|
| | | * **CUDA 9.1**: https://developer.nvidia.com/cuda-downloads |
|---|
| | | * **OpenCV 3.4.0**: https://sourceforge.net/projects/opencvlibrary/files/opencv-win/3.4.0/opencv-3.4.0-vc14_vc15.exe/download |
|---|
| | | * **or OpenCV 2.4.13**: https://sourceforge.net/projects/opencvlibrary/files/opencv-win/2.4.13/opencv-2.4.13.2-vc14.exe/download |
|---|
| | | - OpenCV allows to show image or video detection in the window and store result to file that specified in command line `-out_filename res.avi` |
|---|
| | | * **GPU with CC >= 3.0**: https://en.wikipedia.org/wiki/CUDA#GPUs_supported |
|---|
| | | |
|---|
| | | ##### Pre-trained models for different cfg-files can be downloaded from (smaller -> faster & lower quality): |
|---|
| | | * `yolov3.cfg` (236 MB COCO **Yolo v3**) - requires 4 GB GPU-RAM: https://pjreddie.com/media/files/yolov3.weights |
|---|
| | | * `yolov3-tiny.cfg` (34 MB COCO **Yolo v3 tiny**) - requires 1 GB GPU-RAM: https://pjreddie.com/media/files/yolov3-tiny.weights |
|---|
| | | * `yolov2.cfg` (194 MB COCO Yolo v2) - requires 4 GB GPU-RAM: https://pjreddie.com/media/files/yolov2.weights |
|---|
| | | * `yolo-voc.cfg` (194 MB VOC Yolo v2) - requires 4 GB GPU-RAM: http://pjreddie.com/media/files/yolo-voc.weights |
|---|
| | | * `yolov2-tiny.cfg` (43 MB COCO Yolo v2) - requires 1 GB GPU-RAM: https://pjreddie.com/media/files/yolov2-tiny.weights |
|---|
| | | * `yolov2-tiny-voc.cfg` (60 MB VOC Yolo v2) - requires 1 GB GPU-RAM: http://pjreddie.com/media/files/yolov2-tiny-voc.weights |
|---|
| | | * `yolo9000.cfg` (186 MB Yolo9000-model) - requires 4 GB GPU-RAM: http://pjreddie.com/media/files/yolo9000.weights |
|---|
| | | |
|---|
| | | Put it near compiled: darknet.exe |
|---|
| | | |
|---|
| | | You can get cfg-files by path: `darknet/cfg/` |
|---|
| | | |
|---|
| | | ##### Examples of results: |
|---|
| | | |
|---|
| | | [](https://www.youtube.com/watch?v=VOC3huqHrss "Everything Is AWESOME") |
|---|
| | | |
|---|
| | | Others: https://www.youtube.com/channel/UC7ev3hNVkx4DzZ3LO19oebg |
|---|
| | | |
|---|
| | | ### How to use: |
|---|
| | | |
|---|
| | | ##### Example of usage in cmd-files from `build\darknet\x64\`: |
|---|
| | | |
|---|
| | | * `darknet_yolo_v3.cmd` - initialization with 236 MB **Yolo v3** COCO-model yolov3.weights & yolov3.cfg and show detection on the image: dog.jpg |
|---|
| | | |
|---|
| | | * `darknet_voc.cmd` - initialization with 194 MB VOC-model yolo-voc.weights & yolo-voc.cfg and waiting for entering the name of the image file |
|---|
| | | * `darknet_demo_voc.cmd` - initialization with 194 MB VOC-model yolo-voc.weights & yolo-voc.cfg and play your video file which you must rename to: test.mp4 |
|---|
| | | * `darknet_demo_store.cmd` - initialization with 194 MB VOC-model yolo-voc.weights & yolo-voc.cfg and play your video file which you must rename to: test.mp4, and store result to: res.avi |
|---|
| | | * `darknet_net_cam_voc.cmd` - initialization with 194 MB VOC-model, play video from network video-camera mjpeg-stream (also from you phone) |
|---|
| | | * `darknet_web_cam_voc.cmd` - initialization with 194 MB VOC-model, play video from Web-Camera number #0 |
|---|
| | | * `darknet_coco_9000.cmd` - initialization with 186 MB Yolo9000 COCO-model, and show detection on the image: dog.jpg |
|---|
| | | * `darknet_coco_9000_demo.cmd` - initialization with 186 MB Yolo9000 COCO-model, and show detection on the video (if it is present): street4k.mp4, and store result to: res.avi |
|---|
| | | |
|---|
| | | ##### How to use on the command line: |
|---|
| | | |
|---|
| | | On Linux use `./darknet` instead of `darknet.exe`, like this:`./darknet detector test ./cfg/coco.data ./cfg/yolov3.cfg ./yolov3.weights` |
|---|
| | | |
|---|
| | | * **Yolo v3** COCO - image: `darknet.exe detector test data/coco.data cfg/yolov3.cfg yolov3.weights -i 0 -thresh 0.25` |
|---|
| | | * Alternative method Yolo v3 COCO - image: `darknet.exe detect cfg/yolov3.cfg yolov3.weights -i 0 -thresh 0.25` |
|---|
| | | * Output coordinates of objects: `darknet.exe detector test data/coco.data yolov3.cfg yolov3.weights -thresh 0.25 dog.jpg -ext_output` |
|---|
| | | * 194 MB VOC-model - image: `darknet.exe detector test data/voc.data yolo-voc.cfg yolo-voc.weights -i 0` |
|---|
| | | * 194 MB VOC-model - video: `darknet.exe detector demo data/voc.data yolo-voc.cfg yolo-voc.weights test.mp4 -i 0` |
|---|
| | | * 194 MB VOC-model - **save result to the file res.avi**: `darknet.exe detector demo data/voc.data yolo-voc.cfg yolo-voc.weights test.mp4 -i 0 -out_filename res.avi` |
|---|
| | | * Alternative method 194 MB VOC-model - video: `darknet.exe yolo demo yolo-voc.cfg yolo-voc.weights test.mp4 -i 0` |
|---|
| | | * 43 MB VOC-model for video: `darknet.exe detector demo data/coco.data cfg/yolov2-tiny.cfg yolov2-tiny.weights test.mp4 -i 0` |
|---|
| | | * **Yolo v3** 236 MB COCO for net-videocam - Smart WebCam: `darknet.exe detector demo data/coco.data cfg/yolov3.cfg yolov3.weights http://192.168.0.80:8080/video?dummy=param.mjpg -i 0` |
|---|
| | | * 194 MB VOC-model for net-videocam - Smart WebCam: `darknet.exe detector demo data/voc.data yolo-voc.cfg yolo-voc.weights http://192.168.0.80:8080/video?dummy=param.mjpg -i 0` |
|---|
| | | * 194 MB VOC-model - WebCamera #0: `darknet.exe detector demo data/voc.data yolo-voc.cfg yolo-voc.weights -c 0` |
|---|
| | | * 186 MB Yolo9000 - image: `darknet.exe detector test cfg/combine9k.data yolo9000.cfg yolo9000.weights` |
|---|
| | | * Remeber to put data/9k.tree and data/coco9k.map under the same folder of your app if you use the cpp api to build an app |
|---|
| | | * To process a list of images `data/train.txt` and save results of detection to `result.txt` use: |
|---|
| | | `darknet.exe detector test data/voc.data yolo-voc.cfg yolo-voc.weights -dont_show -ext_output < data/train.txt > result.txt` |
|---|
| | | You can comment this line so that each image does not require pressing the button ESC: https://github.com/AlexeyAB/darknet/blob/6ccb41808caf753feea58ca9df79d6367dedc434/src/detector.c#L509 |
|---|
| | | |
|---|
| | | ##### For using network video-camera mjpeg-stream with any Android smartphone: |
|---|
| | | |
|---|
| | | 1. Download for Android phone mjpeg-stream soft: IP Webcam / Smart WebCam |
|---|
| | | |
|---|
| | | |
|---|
| | | * Smart WebCam - preferably: https://play.google.com/store/apps/details?id=com.acontech.android.SmartWebCam2 |
|---|
| | | * IP Webcam: https://play.google.com/store/apps/details?id=com.pas.webcam |
|---|
| | | |
|---|
| | | 2. Connect your Android phone to computer by WiFi (through a WiFi-router) or USB |
|---|
| | | 3. Start Smart WebCam on your phone |
|---|
| | | 4. Replace the address below, on shown in the phone application (Smart WebCam) and launch: |
|---|
| | | |
|---|
| | | |
|---|
| | | * 194 MB COCO-model: `darknet.exe detector demo data/coco.data yolo.cfg yolo.weights http://192.168.0.80:8080/video?dummy=param.mjpg -i 0` |
|---|
| | | * 194 MB VOC-model: `darknet.exe detector demo data/voc.data yolo-voc.cfg yolo-voc.weights http://192.168.0.80:8080/video?dummy=param.mjpg -i 0` |
|---|
| | | |
|---|
| | | ### How to compile on Linux: |
|---|
| | | |
|---|
| | | Just do `make` in the darknet directory. |
|---|
| | | Before make, you can set such options in the `Makefile`: [link](https://github.com/AlexeyAB/darknet/blob/9c1b9a2cf6363546c152251be578a21f3c3caec6/Makefile#L1) |
|---|
| | | * `GPU=1` to build with CUDA to accelerate by using GPU (CUDA should be in `/usr/local/cuda`) |
|---|
| | | * `CUDNN=1` to build with cuDNN v5-v7 to accelerate training by using GPU (cuDNN should be in `/usr/local/cudnn`) |
|---|
| | | * `CUDNN_HALF=1` to build for Tensor Cores (on Titan V / Tesla V100 / DGX-2 and later) speedup Detection 3x, Training 2x |
|---|
| | | * `OPENCV=1` to build with OpenCV 3.x/2.4.x - allows to detect on video files and video streams from network cameras or web-cams |
|---|
| | | * `DEBUG=1` to bould debug version of Yolo |
|---|
| | | * `OPENMP=1` to build with OpenMP support to accelerate Yolo by using multi-core CPU |
|---|
| | | * `LIBSO=1` to build a library `darknet.so` and binary runable file `uselib` that uses this library. Or you can try to run so `LD_LIBRARY_PATH=./:$LD_LIBRARY_PATH ./uselib test.mp4` How to use this SO-library from your own code - you can look at C++ example: https://github.com/AlexeyAB/darknet/blob/master/src/yolo_console_dll.cpp |
|---|
| | | |
|---|
| | | |
|---|
| | | ### How to compile on Windows: |
|---|
| | | |
|---|
| | | 1. If you have **MSVS 2015, CUDA 9.1, cuDNN 7.0 and OpenCV 3.x** (with paths: `C:\opencv_3.0\opencv\build\include` & `C:\opencv_3.0\opencv\build\x64\vc14\lib`), then start MSVS, open `build\darknet\darknet.sln`, set **x64** and **Release**, and do the: Build -> Build darknet. **NOTE:** If installing OpenCV, use OpenCV 3.4.0 or earlier. This is a bug in OpenCV 3.4.1 in the C API (see [#500](https://github.com/AlexeyAB/darknet/issues/500)). |
|---|
| | | |
|---|
| | | 1.1. Find files `opencv_world320.dll` and `opencv_ffmpeg320_64.dll` (or `opencv_world340.dll` and `opencv_ffmpeg340_64.dll`) in `C:\opencv_3.0\opencv\build\x64\vc14\bin` and put it near with `darknet.exe` |
|---|
| | | |
|---|
| | | 1.2 Check that there are `bin` and `include` folders in the `C:\Program Files\NVIDIA GPU Computing Toolkit\CUDA\v9.1` if aren't, then copy them to this folder from the path where is CUDA installed |
|---|
| | | |
|---|
| | | 1.3. To install CUDNN (speedup neural network), do the following: |
|---|
| | | |
|---|
| | | * download and install **cuDNN 7.0 for CUDA 9.1**: https://developer.nvidia.com/cudnn |
|---|
| | | |
|---|
| | | * add Windows system variable `cudnn` with path to CUDNN: https://hsto.org/files/a49/3dc/fc4/a493dcfc4bd34a1295fd15e0e2e01f26.jpg |
|---|
| | | |
|---|
| | | 1.4. If you want to build **without CUDNN** then: open `\darknet.sln` -> (right click on project) -> properties -> C/C++ -> Preprocessor -> Preprocessor Definitions, and remove this: `CUDNN;` |
|---|
| | | |
|---|
| | | 2. If you have other version of **CUDA (not 9.1)** then open `build\darknet\darknet.vcxproj` by using Notepad, find 2 places with "CUDA 9.1" and change it to your CUDA-version, then do step 1 |
|---|
| | | |
|---|
| | | 3. If you **don't have GPU**, but have **MSVS 2015 and OpenCV 3.0** (with paths: `C:\opencv_3.0\opencv\build\include` & `C:\opencv_3.0\opencv\build\x64\vc14\lib`), then start MSVS, open `build\darknet\darknet_no_gpu.sln`, set **x64** and **Release**, and do the: Build -> Build darknet_no_gpu |
|---|
| | | |
|---|
| | | 4. If you have **OpenCV 2.4.13** instead of 3.0 then you should change pathes after `\darknet.sln` is opened |
|---|
| | | |
|---|
| | | 4.1 (right click on project) -> properties -> C/C++ -> General -> Additional Include Directories: `C:\opencv_2.4.13\opencv\build\include` |
|---|
| | | |
|---|
| | | 4.2 (right click on project) -> properties -> Linker -> General -> Additional Library Directories: `C:\opencv_2.4.13\opencv\build\x64\vc14\lib` |
|---|
| | | |
|---|
| | | 5. If you have GPU with Tensor Cores (nVidia Titan V / Tesla V100 / DGX-2 and later) speedup Detection 3x, Training 2x: |
|---|
| | | `\darknet.sln` -> (right click on project) -> properties -> C/C++ -> Preprocessor -> Preprocessor Definitions, and add here: `CUDNN_HALF;` |
|---|
| | | |
|---|
| | | ### How to compile (custom): |
|---|
| | | |
|---|
| | | Also, you can to create your own `darknet.sln` & `darknet.vcxproj`, this example for CUDA 9.1 and OpenCV 3.0 |
|---|
| | | |
|---|
| | | Then add to your created project: |
|---|
| | | - (right click on project) -> properties -> C/C++ -> General -> Additional Include Directories, put here: |
|---|
| | | |
|---|
| | | `C:\opencv_3.0\opencv\build\include;..\..\3rdparty\include;%(AdditionalIncludeDirectories);$(CudaToolkitIncludeDir);$(cudnn)\include` |
|---|
| | | - (right click on project) -> Build dependecies -> Build Customizations -> set check on CUDA 9.1 or what version you have - for example as here: http://devblogs.nvidia.com/parallelforall/wp-content/uploads/2015/01/VS2013-R-5.jpg |
|---|
| | | - add to project all `.c` & `.cu` files and file `http_stream.cpp` from `\src` |
|---|
| | | - (right click on project) -> properties -> Linker -> General -> Additional Library Directories, put here: |
|---|
| | | |
|---|
| | | `C:\opencv_3.0\opencv\build\x64\vc14\lib;$(CUDA_PATH)lib\$(PlatformName);$(cudnn)\lib\x64;%(AdditionalLibraryDirectories)` |
|---|
| | | - (right click on project) -> properties -> Linker -> Input -> Additional dependecies, put here: |
|---|
| | | |
|---|
| | | `..\..\3rdparty\lib\x64\pthreadVC2.lib;cublas.lib;curand.lib;cudart.lib;cudnn.lib;%(AdditionalDependencies)` |
|---|
| | | - (right click on project) -> properties -> C/C++ -> Preprocessor -> Preprocessor Definitions |
|---|
| | | |
|---|
| | | `OPENCV;_TIMESPEC_DEFINED;_CRT_SECURE_NO_WARNINGS;_CRT_RAND_S;WIN32;NDEBUG;_CONSOLE;_LIB;%(PreprocessorDefinitions)` |
|---|
| | | |
|---|
| | | - compile to .exe (X64 & Release) and put .dll-s near with .exe: |
|---|
| | | |
|---|
| | | * `pthreadVC2.dll, pthreadGC2.dll` from \3rdparty\dll\x64 |
|---|
| | | |
|---|
| | | * `cusolver64_91.dll, curand64_91.dll, cudart64_91.dll, cublas64_91.dll` - 91 for CUDA 9.1 or your version, from C:\Program Files\NVIDIA GPU Computing Toolkit\CUDA\v9.1\bin |
|---|
| | | |
|---|
| | | * For OpenCV 3.2: `opencv_world320.dll` and `opencv_ffmpeg320_64.dll` from `C:\opencv_3.0\opencv\build\x64\vc14\bin` |
|---|
| | | * For OpenCV 2.4.13: `opencv_core2413.dll`, `opencv_highgui2413.dll` and `opencv_ffmpeg2413_64.dll` from `C:\opencv_2.4.13\opencv\build\x64\vc14\bin` |
|---|
| | | |
|---|
| | | ## How to train (Pascal VOC Data): |
|---|
| | | |
|---|
| | | 1. Download pre-trained weights for the convolutional layers (154 MB): http://pjreddie.com/media/files/darknet53.conv.74 and put to the directory `build\darknet\x64` |
|---|
| | | |
|---|
| | | 2. Download The Pascal VOC Data and unpack it to directory `build\darknet\x64\data\voc` will be created dir `build\darknet\x64\data\voc\VOCdevkit\`: |
|---|
| | | * http://pjreddie.com/media/files/VOCtrainval_11-May-2012.tar |
|---|
| | | * http://pjreddie.com/media/files/VOCtrainval_06-Nov-2007.tar |
|---|
| | | * http://pjreddie.com/media/files/VOCtest_06-Nov-2007.tar |
|---|
| | | |
|---|
| | | 2.1 Download file `voc_label.py` to dir `build\darknet\x64\data\voc`: http://pjreddie.com/media/files/voc_label.py |
|---|
| | | |
|---|
| | | 3. Download and install Python for Windows: https://www.python.org/ftp/python/3.5.2/python-3.5.2-amd64.exe |
|---|
| | | |
|---|
| | | 4. Run command: `python build\darknet\x64\data\voc\voc_label.py` (to generate files: 2007_test.txt, 2007_train.txt, 2007_val.txt, 2012_train.txt, 2012_val.txt) |
|---|
| | | |
|---|
| | | 5. Run command: `type 2007_train.txt 2007_val.txt 2012_*.txt > train.txt` |
|---|
| | | |
|---|
| | | 6. Set `batch=64` and `subdivisions=8` in the file `yolov3-voc.cfg`: [link](https://github.com/AlexeyAB/darknet/blob/ee38c6e1513fb089b35be4ffa692afd9b3f65747/cfg/yolov3-voc.cfg#L3-L4) |
|---|
| | | |
|---|
| | | 7. Start training by using `train_voc.cmd` or by using the command line: |
|---|
| | | |
|---|
| | | `darknet.exe detector train data/voc.data cfg/yolov3-voc.cfg darknet53.conv.74` |
|---|
| | | |
|---|
| | | (**Note:** To disable Loss-Window use flag `-dont_show`. If you are using CPU, try `darknet_no_gpu.exe` instead of `darknet.exe`.) |
|---|
| | | |
|---|
| | | If required change pathes in the file `build\darknet\x64\data\voc.data` |
|---|
| | | |
|---|
| | | More information about training by the link: http://pjreddie.com/darknet/yolo/#train-voc |
|---|
| | | |
|---|
| | | **Note:** If during training you see `nan` values in some lines then training goes well, but if `nan` are in all lines then training goes wrong. |
|---|
| | | |
|---|
| | | ## How to train with multi-GPU: |
|---|
| | | |
|---|
| | | 1. Train it first on 1 GPU for like 1000 iterations: `darknet.exe detector train data/voc.data cfg/yolov3-voc.cfg darknet53.conv.74` |
|---|
| | | |
|---|
| | | 2. Then stop and by using partially-trained model `/backup/yolov3-voc_1000.weights` run training with multigpu (up to 4 GPUs): `darknet.exe detector train data/voc.data cfg/yolov3-voc.cfg /backup/yolov3-voc_1000.weights -gpus 0,1,2,3` |
|---|
| | | |
|---|
| | | https://groups.google.com/d/msg/darknet/NbJqonJBTSY/Te5PfIpuCAAJ |
|---|
| | | |
|---|
| | | ## How to train (to detect your custom objects): |
|---|
| | | (to train old Yolo v2 `yolov2-voc.cfg`, `yolov2-tiny-voc.cfg`, `yolo-voc.cfg`, `yolo-voc.2.0.cfg`, ... [click by the link](https://github.com/AlexeyAB/darknet/tree/47c7af1cea5bbdedf1184963355e6418cb8b1b4f#how-to-train-pascal-voc-data)) |
|---|
| | | |
|---|
| | | Training Yolo v3: |
|---|
| | | |
|---|
| | | 1. Create file `yolo-obj.cfg` with the same content as in `yolov3.cfg` (or copy `yolov3.cfg` to `yolo-obj.cfg)` and: |
|---|
| | | |
|---|
| | | * change line batch to [`batch=64`](https://github.com/AlexeyAB/darknet/blob/0039fd26786ab5f71d5af725fc18b3f521e7acfd/cfg/yolov3.cfg#L3) |
|---|
| | | * change line subdivisions to [`subdivisions=8`](https://github.com/AlexeyAB/darknet/blob/0039fd26786ab5f71d5af725fc18b3f521e7acfd/cfg/yolov3.cfg#L4) |
|---|
| | | * change line `classes=80` to your number of objects in each of 3 `[yolo]`-layers: |
|---|
| | | * https://github.com/AlexeyAB/darknet/blob/0039fd26786ab5f71d5af725fc18b3f521e7acfd/cfg/yolov3.cfg#L610 |
|---|
| | | * https://github.com/AlexeyAB/darknet/blob/0039fd26786ab5f71d5af725fc18b3f521e7acfd/cfg/yolov3.cfg#L696 |
|---|
| | | * https://github.com/AlexeyAB/darknet/blob/0039fd26786ab5f71d5af725fc18b3f521e7acfd/cfg/yolov3.cfg#L783 |
|---|
| | | * change [`filters=255`] to filters=(classes + 5)x3 in the 3 `[convolutional]` before each `[yolo]` layer |
|---|
| | | * https://github.com/AlexeyAB/darknet/blob/0039fd26786ab5f71d5af725fc18b3f521e7acfd/cfg/yolov3.cfg#L603 |
|---|
| | | * https://github.com/AlexeyAB/darknet/blob/0039fd26786ab5f71d5af725fc18b3f521e7acfd/cfg/yolov3.cfg#L689 |
|---|
| | | * https://github.com/AlexeyAB/darknet/blob/0039fd26786ab5f71d5af725fc18b3f521e7acfd/cfg/yolov3.cfg#L776 |
|---|
| | | |
|---|
| | | So if `classes=1` then should be `filters=18`. If `classes=2` then write `filters=21`. |
|---|
| | | |
|---|
| | | **(Do not write in the cfg-file: filters=(classes + 5)x3)** |
|---|
| | | |
|---|
| | | (Generally `filters` depends on the `classes`, `coords` and number of `mask`s, i.e. filters=`(classes + coords + 1)*<number of mask>`, where `mask` is indices of anchors. If `mask` is absence, then filters=`(classes + coords + 1)*num`) |
|---|
| | | |
|---|
| | | So for example, for 2 objects, your file `yolo-obj.cfg` should differ from `yolov3.cfg` in such lines in each of **3** [yolo]-layers: |
|---|
| | | |
|---|
| | | ``` |
|---|
| | | [convolutional] |
|---|
| | | filters=21 |
|---|
| | | |
|---|
| | | [region] |
|---|
| | | classes=2 |
|---|
| | | ``` |
|---|
| | | |
|---|
| | | 2. Create file `obj.names` in the directory `build\darknet\x64\data\`, with objects names - each in new line |
|---|
| | | |
|---|
| | | 3. Create file `obj.data` in the directory `build\darknet\x64\data\`, containing (where **classes = number of objects**): |
|---|
| | | |
|---|
| | | ``` |
|---|
| | | classes= 2 |
|---|
| | | train = data/train.txt |
|---|
| | | valid = data/test.txt |
|---|
| | | names = data/obj.names |
|---|
| | | backup = backup/ |
|---|
| | | ``` |
|---|
| | | |
|---|
| | | 4. Put image-files (.jpg) of your objects in the directory `build\darknet\x64\data\obj\` |
|---|
| | | |
|---|
| | | 5. You should label each object on images from your dataset. Use this visual GUI-software for marking bounded boxes of objects and generating annotation files for Yolo v2 & v3: https://github.com/AlexeyAB/Yolo_mark |
|---|
| | | |
|---|
| | | It will create `.txt`-file for each `.jpg`-image-file - in the same directory and with the same name, but with `.txt`-extension, and put to file: object number and object coordinates on this image, for each object in new line: `<object-class> <x> <y> <width> <height>` |
|---|
| | | |
|---|
| | | Where: |
|---|
| | | * `<object-class>` - integer number of object from `0` to `(classes-1)` |
|---|
| | | * `<x> <y> <width> <height>` - float values relative to width and height of image, it can be equal from (0.0 to 1.0] |
|---|
| | | * for example: `<x> = <absolute_x> / <image_width>` or `<height> = <absolute_height> / <image_height>` |
|---|
| | | * atention: `<x> <y>` - are center of rectangle (are not top-left corner) |
|---|
| | | |
|---|
| | | For example for `img1.jpg` you will be created `img1.txt` containing: |
|---|
| | | |
|---|
| | | ``` |
|---|
| | | 1 0.716797 0.395833 0.216406 0.147222 |
|---|
| | | 0 0.687109 0.379167 0.255469 0.158333 |
|---|
| | | 1 0.420312 0.395833 0.140625 0.166667 |
|---|
| | | ``` |
|---|
| | | |
|---|
| | | 6. Create file `train.txt` in directory `build\darknet\x64\data\`, with filenames of your images, each filename in new line, with path relative to `darknet.exe`, for example containing: |
|---|
| | | |
|---|
| | | ``` |
|---|
| | | data/obj/img1.jpg |
|---|
| | | data/obj/img2.jpg |
|---|
| | | data/obj/img3.jpg |
|---|
| | | ``` |
|---|
| | | |
|---|
| | | 7. Download pre-trained weights for the convolutional layers (154 MB): https://pjreddie.com/media/files/darknet53.conv.74 and put to the directory `build\darknet\x64` |
|---|
| | | |
|---|
| | | 8. Start training by using the command line: `darknet.exe detector train data/obj.data yolo-obj.cfg darknet53.conv.74` |
|---|
| | | |
|---|
| | | (file `yolo-obj_xxx.weights` will be saved to the `build\darknet\x64\backup\` for each 100 iterations) |
|---|
| | | (To disable Loss-Window use `darknet.exe detector train data/obj.data yolo-obj.cfg darknet53.conv.74 -dont_show`, if you train on computer without monitor like a cloud Amazaon EC2) |
|---|
| | | |
|---|
| | | 9. After training is complete - get result `yolo-obj_final.weights` from path `build\darknet\x64\backup\` |
|---|
| | | |
|---|
| | | * After each 100 iterations you can stop and later start training from this point. For example, after 2000 iterations you can stop training, and later just copy `yolo-obj_2000.weights` from `build\darknet\x64\backup\` to `build\darknet\x64\` and start training using: `darknet.exe detector train data/obj.data yolo-obj.cfg yolo-obj_2000.weights` |
|---|
| | | |
|---|
| | | (in the original repository https://github.com/pjreddie/darknet the weights-file is saved only once every 10 000 iterations `if(iterations > 1000)`) |
|---|
| | | |
|---|
| | | * Also you can get result earlier than all 45000 iterations. |
|---|
| | | |
|---|
| | | **Note:** If during training you see `nan` values in some lines then training goes well, but if `nan` are in all lines then training goes wrong. |
|---|
| | | |
|---|
| | | ### How to train tiny-yolo (to detect your custom objects): |
|---|
| | | |
|---|
| | | Do all the same steps as for the full yolo model as described above. With the exception of: |
|---|
| | | * Download default weights file for yolov2-tiny-voc: http://pjreddie.com/media/files/yolov2-tiny-voc.weights |
|---|
| | | * Get pre-trained weights yolov2-tiny-voc.conv.13 using command: `darknet.exe partial cfg/yolov2-tiny-voc.cfg yolov2-tiny-voc.weights yolov2-tiny-voc.conv.13 13` |
|---|
| | | * Make your custom model `yolov2-tiny-obj.cfg` based on `cfg/yolov2-tiny-voc.cfg` instead of `yolov3.cfg` |
|---|
| | | * Start training: `darknet.exe detector train data/obj.data yolov2-tiny-obj.cfg yolov2-tiny-voc.conv.13` |
|---|
| | | |
|---|
| | | For training Yolo based on other models ([DenseNet201-Yolo](https://github.com/AlexeyAB/darknet/blob/master/build/darknet/x64/densenet201_yolo.cfg) or [ResNet50-Yolo](https://github.com/AlexeyAB/darknet/blob/master/build/darknet/x64/resnet50_yolo.cfg)), you can download and get pre-trained weights as showed in this file: https://github.com/AlexeyAB/darknet/blob/master/build/darknet/x64/partial.cmd |
|---|
| | | If you made you custom model that isn't based on other models, then you can train it without pre-trained weights, then will be used random initial weights. |
|---|
| | | |
|---|
| | | ## When should I stop training: |
|---|
| | | |
|---|
| | | Usually sufficient 2000 iterations for each class(object). But for a more precise definition when you should stop training, use the following manual: |
|---|
| | | |
|---|
| | | 1. During training, you will see varying indicators of error, and you should stop when no longer decreases **0.XXXXXXX avg**: |
|---|
| | | |
|---|
| | | > Region Avg IOU: 0.798363, Class: 0.893232, Obj: 0.700808, No Obj: 0.004567, Avg Recall: 1.000000, count: 8 |
|---|
| | | > Region Avg IOU: 0.800677, Class: 0.892181, Obj: 0.701590, No Obj: 0.004574, Avg Recall: 1.000000, count: 8 |
|---|
| | | > |
|---|
| | | > **9002**: 0.211667, **0.060730 avg**, 0.001000 rate, 3.868000 seconds, 576128 images |
|---|
| | | > Loaded: 0.000000 seconds |
|---|
| | | |
|---|
| | | * **9002** - iteration number (number of batch) |
|---|
| | | * **0.060730 avg** - average loss (error) - **the lower, the better** |
|---|
| | | |
|---|
| | | When you see that average loss **0.xxxxxx avg** no longer decreases at many iterations then you should stop training. |
|---|
| | | |
|---|
| | | 2. Once training is stopped, you should take some of last `.weights`-files from `darknet\build\darknet\x64\backup` and choose the best of them: |
|---|
| | | |
|---|
| | | For example, you stopped training after 9000 iterations, but the best result can give one of previous weights (7000, 8000, 9000). It can happen due to overfitting. **Overfitting** - is case when you can detect objects on images from training-dataset, but can't detect ojbects on any others images. You should get weights from **Early Stopping Point**: |
|---|
| | | |
|---|
| | |  |
|---|
| | | |
|---|
| | | To get weights from Early Stopping Point: |
|---|
| | | |
|---|
| | | 2.1. At first, in your file `obj.data` you must specify the path to the validation dataset `valid = valid.txt` (format of `valid.txt` as in `train.txt`), and if you haven't validation images, just copy `data\train.txt` to `data\valid.txt`. |
|---|
| | | |
|---|
| | | 2.2 If training is stopped after 9000 iterations, to validate some of previous weights use this commands: |
|---|
| | | |
|---|
| | | (If you use another GitHub repository, then use `darknet.exe detector recall`... instead of `darknet.exe detector map`...) |
|---|
| | | |
|---|
| | | * `darknet.exe detector map data/obj.data yolo-obj.cfg backup\yolo-obj_7000.weights` |
|---|
| | | * `darknet.exe detector map data/obj.data yolo-obj.cfg backup\yolo-obj_8000.weights` |
|---|
| | | * `darknet.exe detector map data/obj.data yolo-obj.cfg backup\yolo-obj_9000.weights` |
|---|
| | | |
|---|
| | | And comapre last output lines for each weights (7000, 8000, 9000): |
|---|
| | | |
|---|
| | | Choose weights-file **with the highest IoU** (intersect of union) and mAP (mean average precision) |
|---|
| | | |
|---|
| | | For example, **bigger IOU** gives weights `yolo-obj_8000.weights` - then **use this weights for detection**. |
|---|
| | | |
|---|
| | | Example of custom object detection: `darknet.exe detector test data/obj.data yolo-obj.cfg yolo-obj_8000.weights` |
|---|
| | | |
|---|
| | | * **IoU** (intersect of union) - average instersect of union of objects and detections for a certain threshold = 0.24 |
|---|
| | | |
|---|
| | | * **mAP** (mean average precision) - mean value of `average precisions` for each class, where `average precision` is average value of 11 points on PR-curve for each possible threshold (each probability of detection) for the same class (Precision-Recall in terms of PascalVOC, where Precision=TP/(TP+FP) and Recall=TP/(TP+FN) ), page-11: http://homepages.inf.ed.ac.uk/ckiw/postscript/ijcv_voc09.pdf |
|---|
| | | |
|---|
| | | **mAP** is default metric of precision in the PascalVOC competition, **this is the same as AP50** metric in the MS COCO competition. |
|---|
| | | In terms of Wiki, indicators Precision and Recall have a slightly different meaning than in the PascalVOC competition, but **IoU always has the same meaning**. |
|---|
| | | |
|---|
| | |  |
|---|
| | | |
|---|
| | | ### How to calculate mAP on PascalVOC 2007: |
|---|
| | | |
|---|
| | | 1. To calculate mAP (mean average precision) on PascalVOC-2007-test: |
|---|
| | | * Download PascalVOC dataset, install Python 3.x and get file `2007_test.txt` as described here: https://github.com/AlexeyAB/darknet#how-to-train-pascal-voc-data |
|---|
| | | * Then download file https://raw.githubusercontent.com/AlexeyAB/darknet/master/scripts/voc_label_difficult.py to the dir `build\darknet\x64\data\` then run `voc_label_difficult.py` to get the file `difficult_2007_test.txt` |
|---|
| | | * Remove symbol `#` from this line to un-comment it: https://github.com/AlexeyAB/darknet/blob/master/build/darknet/x64/data/voc.data#L4 |
|---|
| | | * Then there are 2 ways to get mAP: |
|---|
| | | 1. Using Darknet + Python: run the file `build/darknet/x64/calc_mAP_voc_py.cmd` - you will get mAP for `yolo-voc.cfg` model, mAP = 75.9% |
|---|
| | | 2. Using this fork of Darknet: run the file `build/darknet/x64/calc_mAP.cmd` - you will get mAP for `yolo-voc.cfg` model, mAP = 75.8% |
|---|
| | | |
|---|
| | | (The article specifies the value of mAP = 76.8% for YOLOv2 416×416, page-4 table-3: https://arxiv.org/pdf/1612.08242v1.pdf. We get values lower - perhaps due to the fact that the model was trained on a slightly different source code than the code on which the detection is was done) |
|---|
| | | |
|---|
| | | * if you want to get mAP for `tiny-yolo-voc.cfg` model, then un-comment line for tiny-yolo-voc.cfg and comment line for yolo-voc.cfg in the .cmd-file |
|---|
| | | * if you have Python 2.x instead of Python 3.x, and if you use Darknet+Python-way to get mAP, then in your cmd-file use `reval_voc.py` and `voc_eval.py` instead of `reval_voc_py3.py` and `voc_eval_py3.py` from this directory: https://github.com/AlexeyAB/darknet/tree/master/scripts |
|---|
| | | |
|---|
| | | ### Custom object detection: |
|---|
| | | |
|---|
| | | Example of custom object detection: `darknet.exe detector test data/obj.data yolo-obj.cfg yolo-obj_8000.weights` |
|---|
| | | |
|---|
| | | |  |  | |
|---|
| | | |---|---| |
|---|
| | | |
|---|
| | | ## How to improve object detection: |
|---|
| | | |
|---|
| | | 1. Before training: |
|---|
| | | * set flag `random=1` in your `.cfg`-file - it will increase precision by training Yolo for different resolutions: [link](https://github.com/AlexeyAB/darknet/blob/0039fd26786ab5f71d5af725fc18b3f521e7acfd/cfg/yolov3.cfg#L788) |
|---|
| | | |
|---|
| | | * increase network resolution in your `.cfg`-file (`height=608`, `width=608` or any value multiple of 32) - it will increase precision |
|---|
| | | |
|---|
| | | * recalculate anchors for your dataset for `width` and `height` from cfg-file: |
|---|
| | | `darknet.exe detector calc_anchors data/obj.data -num_of_clusters 9 -width 416 -height 416` |
|---|
| | | then set the same 9 `anchors` in each of 3 `[yolo]`-layers in your cfg-file |
|---|
| | | |
|---|
| | | * desirable that your training dataset include images with objects at diffrent: scales, rotations, lightings, from different sides, on different backgrounds |
|---|
| | | |
|---|
| | | * desirable that your training dataset include images with non-labeled objects that you do not want to detect - negative samples without bounded box (empty `.txt` files) |
|---|
| | | |
|---|
| | | * for training with a large number of objects in each image, add the parameter `max=200` or higher value in the last layer [region] in your cfg-file |
|---|
| | | |
|---|
| | | * to speedup training (with decreasing detection accuracy) do Fine-Tuning instead of Transfer-Learning, set param `stopbackward=1` in one of the penultimate convolutional layers before the 1-st `[yolo]`-layer, for example here: https://github.com/AlexeyAB/darknet/blob/0039fd26786ab5f71d5af725fc18b3f521e7acfd/cfg/yolov3.cfg#L598 |
|---|
| | | |
|---|
| | | 2. After training - for detection: |
|---|
| | | |
|---|
| | | * Increase network-resolution by set in your `.cfg`-file (`height=608` and `width=608`) or (`height=832` and `width=832`) or (any value multiple of 32) - this increases the precision and makes it possible to detect small objects: [link](https://github.com/AlexeyAB/darknet/blob/0039fd26786ab5f71d5af725fc18b3f521e7acfd/cfg/yolov3.cfg#L8-L9) |
|---|
| | | |
|---|
| | | * you do not need to train the network again, just use `.weights`-file already trained for 416x416 resolution |
|---|
| | | * if error `Out of memory` occurs then in `.cfg`-file you should increase `subdivisions=16`, 32 or 64: [link](https://github.com/AlexeyAB/darknet/blob/0039fd26786ab5f71d5af725fc18b3f521e7acfd/cfg/yolov3.cfg#L4) |
|---|
| | | |
|---|
| | | ## How to mark bounded boxes of objects and create annotation files: |
|---|
| | | |
|---|
| | | Here you can find repository with GUI-software for marking bounded boxes of objects and generating annotation files for Yolo v2 & v3: https://github.com/AlexeyAB/Yolo_mark |
|---|
| | | |
|---|
| | | With example of: `train.txt`, `obj.names`, `obj.data`, `yolo-obj.cfg`, `air`1-6`.txt`, `bird`1-4`.txt` for 2 classes of objects (air, bird) and `train_obj.cmd` with example how to train this image-set with Yolo v2 & v3 |
|---|
| | | |
|---|
| | | ## Using Yolo9000 |
|---|
| | | |
|---|
| | | Simultaneous detection and classification of 9000 objects: |
|---|
| | | |
|---|
| | | * `yolo9000.weights` - (186 MB Yolo9000 Model) requires 4 GB GPU-RAM: http://pjreddie.com/media/files/yolo9000.weights |
|---|
| | | |
|---|
| | | * `yolo9000.cfg` - cfg-file of the Yolo9000, also there are paths to the `9k.tree` and `coco9k.map` https://github.com/AlexeyAB/darknet/blob/617cf313ccb1fe005db3f7d88dec04a04bd97cc2/cfg/yolo9000.cfg#L217-L218 |
|---|
| | | |
|---|
| | | * `9k.tree` - **WordTree** of 9418 categories - `<label> <parent_it>`, if `parent_id == -1` then this label hasn't parent: https://raw.githubusercontent.com/AlexeyAB/darknet/master/build/darknet/x64/data/9k.tree |
|---|
| | | |
|---|
| | | * `coco9k.map` - map 80 categories from MSCOCO to WordTree `9k.tree`: https://raw.githubusercontent.com/AlexeyAB/darknet/master/build/darknet/x64/data/coco9k.map |
|---|
| | | |
|---|
| | | * `combine9k.data` - data file, there are paths to: `9k.labels`, `9k.names`, `inet9k.map`, (change path to your `combine9k.train.list`): https://raw.githubusercontent.com/AlexeyAB/darknet/master/build/darknet/x64/data/combine9k.data |
|---|
| | | |
|---|
| | | * `9k.labels` - 9418 labels of objects: https://raw.githubusercontent.com/AlexeyAB/darknet/master/build/darknet/x64/data/9k.labels |
|---|
| | | |
|---|
| | | * `9k.names` - |
|---|
| | | 9418 names of objects: https://raw.githubusercontent.com/AlexeyAB/darknet/master/build/darknet/x64/data/9k.names |
|---|
| | | |
|---|
| | | * `inet9k.map` - map 200 categories from ImageNet to WordTree `9k.tree`: https://raw.githubusercontent.com/AlexeyAB/darknet/master/build/darknet/x64/data/inet9k.map |
|---|
| | | |
|---|
| | | |
|---|
| | | ## How to use Yolo as DLL |
|---|
| | | |
|---|
| | | 1. To compile Yolo as C++ DLL-file `yolo_cpp_dll.dll` - open in MSVS2015 file `build\darknet\yolo_cpp_dll.sln`, set **x64** and **Release**, and do the: Build -> Build yolo_cpp_dll |
|---|
| | | * You should have installed **CUDA 9.1** |
|---|
| | | * To use cuDNN do: (right click on project) -> properties -> C/C++ -> Preprocessor -> Preprocessor Definitions, and add at the beginning of line: `CUDNN;` |
|---|
| | | |
|---|
| | | 2. To use Yolo as DLL-file in your C++ console application - open in MSVS2015 file `build\darknet\yolo_console_dll.sln`, set **x64** and **Release**, and do the: Build -> Build yolo_console_dll |
|---|
| | | You can run the demo using the following: |
|---|
| | | |
|---|
| | | * you can run your console application from Windows Explorer `build\darknet\x64\yolo_console_dll.exe` |
|---|
| | | * or you can run from MSVS2015 (before this - you should copy 2 files `yolo-voc.cfg` and `yolo-voc.weights` to the directory `build\darknet\` ) |
|---|
| | | * after launching your console application and entering the image file name - you will see info for each object: |
|---|
| | | `<obj_id> <left_x> <top_y> <width> <height> <probability>` |
|---|
| | | * to use simple OpenCV-GUI you should uncomment line `//#define OPENCV` in `yolo_console_dll.cpp`-file: [link](https://github.com/AlexeyAB/darknet/blob/a6cbaeecde40f91ddc3ea09aa26a03ab5bbf8ba8/src/yolo_console_dll.cpp#L5) |
|---|
| | | * you can see source code of simple example for detection on the video file: [link](https://github.com/AlexeyAB/darknet/blob/ab1c5f9e57b4175f29a6ef39e7e68987d3e98704/src/yolo_console_dll.cpp#L75) |
|---|
| | | |
|---|
| | | `yolo_cpp_dll.dll`-API: [link](https://github.com/AlexeyAB/darknet/blob/master/src/yolo_v2_class.hpp#L42) |
|---|
| | | ``` |
|---|
| | | class Detector { |
|---|
| | | public: |
|---|
| | | Detector(std::string cfg_filename, std::string weight_filename, int gpu_id = 0); |
|---|
| | | ~Detector(); |
|---|
| | | |
|---|
| | | std::vector<bbox_t> detect(std::string image_filename, float thresh = 0.2, bool use_mean = false); |
|---|
| | | std::vector<bbox_t> detect(image_t img, float thresh = 0.2, bool use_mean = false); |
|---|
| | | static image_t load_image(std::string image_filename); |
|---|
| | | static void free_image(image_t m); |
|---|
| | | |
|---|
| | | #ifdef OPENCV |
|---|
| | | std::vector<bbox_t> detect(cv::Mat mat, float thresh = 0.2, bool use_mean = false); |
|---|
| | | #endif |
|---|
| | | }; |
|---|
| | | python3 opencv_dnn.py [-i path/to/input/file -o path/to/output/directory -hs (one of 16/32) -dsp -dbg -gph] |
|---|
| | | ``` |
|---|
| | | |
|---|
| | | Initially, the project used a powerful neural network named ['You Only Look Once (YOLO)'](https://arxiv.org/pdf/1506.02640v5.pdf) to detect individual cards, but it has been removed as of Oct 12th, 2018 [(note)](https://github.com/hj3yoo/mtg_card_detector#oct-12th-2018) in favour of classical CV techniques. |
|---|
| | | |
|---|
| | | **Demo:** |
|---|
| | | |
|---|
| | | [](https://www.youtube.com/watch?v=kFE_k-mWo2A "Demo #2") |
|---|
| | | |
|---|
| | | You can still find the files used to train them: |
|---|
| | | |
|---|
| | | - [tiny_yolo.cfg](https://github.com/hj3yoo/mtg_card_detector/blob/master/cfg/tiny_yolo.cfg) |
|---|
| | | - [tiny_yolo_final.weights](https://github.com/hj3yoo/mtg_card_detector/blob/master/weights/second_general/tiny_yolo_final.weights) |
|---|
| | | - [obj.data](https://github.com/hj3yoo/mtg_card_detector/blob/master/data/obj.data) and [obj.names](https://github.com/hj3yoo/mtg_card_detector/blob/master/data/obj.names) |
|---|
| | | - [fetch_data.py](https://github.com/hj3yoo/mtg_card_detector/blob/master/fetch_data.py): aggregates card images and database from [scryfall.com](https://scryfall.com/) |
|---|
| | | - [transform_data.py](https://github.com/hj3yoo/mtg_card_detector/blob/master/transform_data.py): generate training images using the aggregated card images and database |
|---|
| | | - [setup_train.py](https://github.com/hj3yoo/mtg_card_detector/blob/master/setup_train.py): create train.txt and test.txt required to train YOLO from the training dataset |
|---|
| | | |
|---|
| | | --------------------------------------------------------------------- |
|---|
| | | |
|---|
| | | ## Day ~0: Sep 6th, 2018 |
|---|
| | | |
|---|
| | | Uploading all the progresses on the model training for the last few days. |
|---|
| | | |
|---|
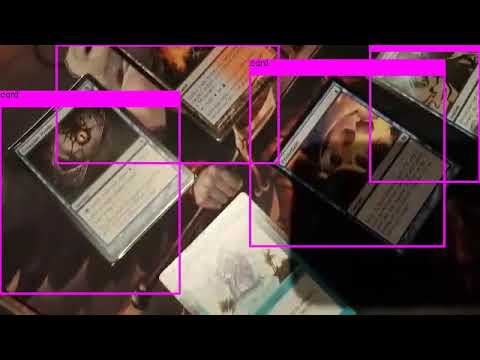
| | | First batch of model training is completed, where I used ~40,000 generated images of MTG cards laid out in one of the pre-defined pattern. |
|---|
| | | |
|---|
| | | <img src="https://github.com/hj3yoo/darknet/blob/master/figures/0_training_set_example_1.jpg" width="360"> <img src="https://github.com/hj3yoo/darknet/blob/master/figures/0_training_set_example_2.jpg" width="360"> <img src="https://github.com/hj3yoo/darknet/blob/master/figures/0_training_set_example_3.jpg" width="360"> |
|---|
| | | |
|---|
| | | After 5000 training epochs, the model got 88% validation accuracy on the generated test set. |
|---|
| | | |
|---|
| | | <img src="https://github.com/hj3yoo/darknet/blob/master/figures/0_detection_result_1.jpg" width="360"> <img src="https://github.com/hj3yoo/darknet/blob/master/figures/0_detection_result_2.jpg" width="360"> <img src="https://github.com/hj3yoo/darknet/blob/master/figures/0_detection_result_3.jpg" width="360"> <img src="https://github.com/hj3yoo/darknet/blob/master/figures/0_detection_result_4.jpg" width="360"> |
|---|
| | | |
|---|
| | | However, there are some blind spots on the model, notably: |
|---|
| | | |
|---|
| | | - Fails to spot some of the obscured cards, where only a fraction of them are shown. |
|---|
| | | - Fairly fragile against any glaring or light variations. |
|---|
| | | - Cannot detect any skewed cards. |
|---|
| | | |
|---|
| | | Example of bad detections: |
|---|
| | | |
|---|
| | | <img src="https://github.com/hj3yoo/darknet/blob/master/figures/0_detection_result_5.jpg" width="360"> <img src="https://github.com/hj3yoo/darknet/blob/master/figures/0_detection_result_6.jpg" width="360"> <img src="https://github.com/hj3yoo/darknet/blob/master/figures/0_detection_result_7.jpg" width="360"> |
|---|
| | | |
|---|
| | | The second and third problems should easily be solved by further augmenting the dataset with random lighting and image skew. I'll have to think more about the first problem, though. |
|---|
| | | |
|---|
| | | ## Sept 7th, 2018 |
|---|
| | | |
|---|
| | | Added several image augmentation techniques to apply to the training set: noise, dropout, light variation, and glaring: |
|---|
| | | |
|---|
| | | <img src="https://github.com/hj3yoo/darknet/blob/master/figures/1_augmented_set_example_1.jpg" width="360"> <img src="https://github.com/hj3yoo/darknet/blob/master/figures/1_augmented_set_example_2.jpg" width="360"> <img src="https://github.com/hj3yoo/darknet/blob/master/figures/1_augmented_set_example_3.jpg" width="360"> <img src="https://github.com/hj3yoo/darknet/blob/master/figures/1_augmented_set_example_4.jpg" width="360"> |
|---|
| | | |
|---|
| | | Currently trying to generate enough images to start model training. Hopefully this helps. |
|---|
| | | |
|---|
| | | Recompiled darknet with OpenCV and CUDNN installed, and recalculated anchors. |
|---|
| | | |
|---|
| | | ----------------------- |
|---|
| | | |
|---|
| | | I've ran a quick training with tiny_yolo configuration with new training data, and Voila! The model performs significantly better than the last iteration, even against some hard images with glaring & skew! The first prediction model can't detect anything from these new test images, so this is a huge improvement to the model :) |
|---|
| | | |
|---|
| | | <img src="https://github.com/hj3yoo/darknet/blob/master/figures/1_detection_result_1.jpg" width="360"> <img src="https://github.com/hj3yoo/darknet/blob/master/figures/1_decision_result_2.jpg" width="360"> <img src="https://github.com/hj3yoo/darknet/blob/master/figures/1_decision_result_3.jpg" width="360"> <img src="https://github.com/hj3yoo/darknet/blob/master/figures/1_decision_result_4.jpg" width="360"> <img src="https://github.com/hj3yoo/darknet/blob/master/figures/1_decision_result_5.jpg" width="360"> <img src="https://github.com/hj3yoo/darknet/blob/master/figures/1_decision_result_6.jpg" width="360"> |
|---|
| | | |
|---|
| | | <img src="https://github.com/hj3yoo/darknet/blob/master/figures/1_learning_curve.jpg" width="640"> |
|---|
| | | |
|---|
| | | The video demo can be found here: https://www.youtube.com/watch?v=kFE_k-mWo2A&feature=youtu.be |
|---|
| | | |
|---|
| | | |
|---|
| | | ## Sept 10th, 2018 |
|---|
| | | |
|---|
| | | I've been training a new model with a full YOLOv3 configuration (previous one used Tiny YOLOv3), and it's been taking a lot more resources: |
|---|
| | | |
|---|
| | | <img src="https://github.com/hj3yoo/darknet/blob/master/figures/2_learning_curve.jpg" width="640"> |
|---|
| | | |
|---|
| | | The author of darknet did mention that full network will take significantly more training effort, so I'll just have to wait. At this rate, it should reach 50k epoch in about a week :/ |
|---|
| | | |
|---|
| | | |
|---|
| | | ## Sept 13th, 2018 |
|---|
| | | |
|---|
| | | The training for full YOLOv3 model has turned sour - the loss saturated around 0.45, and didn't seem like it would improve in any reasonable amount of time. |
|---|
| | | |
|---|
| | | <img src="https://github.com/hj3yoo/darknet/blob/master/figures/3_learning_curve.jpg" width="640"> |
|---|
| | | |
|---|
| | | As expected, the performance of the model with 0.45 loss was fairly bad. Not to mention that it's quite slower, too. I've decided to continue with tiny YOLOv3 weights. I tried to train it further, but it was already saturated, and was the best it could get. |
|---|
| | | |
|---|
| | | --------------------- |
|---|
| | | |
|---|
| | | Bad news, I couldn't find any repo that has python wrapper for darknet to pursue this project further. There is a [python example](https://github.com/AlexeyAB/darknet/blob/master/darknet.py) in the original repo of this fork, but [it doesn't support video input](https://github.com/AlexeyAB/darknet/issues/955). Other darknet repos are in the same situation. |
|---|
| | | |
|---|
| | | I suppose there is a poor man's alternative - feed individual frames from the video into the detection script for image. I'll have to give it a shot. |
|---|
| | | |
|---|
| | | |
|---|
| | | ## Sept 14th, 2018 |
|---|
| | | |
|---|
| | | Thankfully, OpenCV had an implementation for DNN, which supports YOLO as well. They have done quite an amazing job, and the speed isn't too bad, either. I can score about 20~25fps on my tiny YOLO, without using GPU. |
|---|
| | | |
|---|
| | | |
|---|
| | | ## Sept 15th, 2018 |
|---|
| | | |
|---|
| | | I tried to do an alternate approach - instead of making model identify cards as annonymous, train the model for EVERY single card. As you may imagine, this isn't sustainable for 10000+ different cards that exists in MTG, but I thought it would be reasonable for classifying 10 different cards. |
|---|
| | | |
|---|
| | | Result? Suprisingly effective. |
|---|
| | | |
|---|
| | | <img src="https://github.com/hj3yoo/darknet/blob/master/figures/4_detection_result_1.jpg" width="360"> <img src="https://github.com/hj3yoo/darknet/blob/master/figures/4_detection_result_2.jpg" width="360"><img src="https://github.com/hj3yoo/darknet/blob/master/figures/4_detection_result_3.jpg" width="360"> <img src="https://github.com/hj3yoo/darknet/blob/master/figures/4_detection_result_4.png" width="360"> |
|---|
| | | |
|---|
| | | They're of course slightly worse than annonymous detection and impractical for any large number of cardbase, but it was an interesting approach. |
|---|
| | | |
|---|
| | | ------------------ |
|---|
| | | |
|---|
| | | I've made a quick openCV algorithm to extract cards from the image, and it works decently well: |
|---|
| | | |
|---|
| | | <img src="https://github.com/hj3yoo/darknet/blob/master/figures/4_detection_result_5.jpg" width="360"> |
|---|
| | | |
|---|
| | | At the moment, it's fairly limited - the entire card must be shown without obstruction nor cropping, otherwise it won't detect at all. |
|---|
| | | |
|---|
| | | Unfortunately, there is very little use case for my trained network in this algorithm. It's just using contour detection and perceptual hashing to match the card. |
|---|
| | | |
|---|
| | | |
|---|
| | | ## Sept 16th, 2018 |
|---|
| | | |
|---|
| | | I've tweaked the openCV algorithm from yesterday and ran for a demo: |
|---|
| | | |
|---|
| | | https://www.youtube.com/watch?v=BZkRZDyhMRE&feature=youtu.be |
|---|
| | | |
|---|
| | | ## Oct 4th, 2018 |
|---|
| | | |
|---|
| | | With the current model I have, there seems to be little hope - I simply don't have enough knowledge in classical CV technique to separate overlaying cards. Even if I could, perceptual hash will be harder to use if I were to use only a fraction of a card image to classify it. |
|---|
| | | |
|---|
| | | There is an alternative to venture into instance segmentation with [mask R-CNN](https://arxiv.org/pdf/1703.06870.pdf), at the cost of losing real-time processing speed (and considerably more development time). Maybe worth a shot, although I'd have to nearly start from scratch (other than training data generation). |
|---|
| | | |
|---|
| | | ## Oct 10th, 2018 |
|---|
| | | |
|---|
| | | I've been trying to fiddle with the mask R-CNN using [this repo](https://github.com/matterport/Mask_RCNN)'s implementation, and got to train them with 60 manually labelled image set. The result is not too bad considering such a small dataset was used. However, there was a high FP rate overall (again, probably because of small dataset and the simplistic features of cards). |
|---|
| | | |
|---|
| | | <img src="https://github.com/hj3yoo/mtg_card_detector/blob/master/figures/5_rcnn_result_1.png" width="360"><img src="https://github.com/hj3yoo/mtg_card_detector/blob/master/figures/5_rcnn_result_2.png" width="360"><img src="https://github.com/hj3yoo/mtg_card_detector/blob/master/figures/5_rcnn_result_3.png" width="360"><img src="https://github.com/hj3yoo/mtg_card_detector/blob/master/figures/5_rcnn_result_4.png" width="360"><img src="https://github.com/hj3yoo/mtg_card_detector/blob/master/figures/5_rcnn_result_5.png" width="360"> |
|---|
| | | |
|---|
| | | Although it may be worth to generate large training dataset and train the model more thoroughly, I'm being short on time, as there are other priorities to do. I may revisit this later. I will be cleaning this repo in the next few days, wrapping it up for now. |
|---|
| | | |
|---|
| | | ## Oct 12th, 2018 |
|---|
| | | |
|---|
| | | I've been able to significantly cut down the processing time of the current implementation. For n cards detected in the video, the latency has decreased from (65+50n)ms to (7+16n)ms. There were two major bottlenecks that was slowing the program down: |
|---|
| | | |
|---|
| | | -------------------------- |
|---|
| | | |
|---|
| | | In order to identify the card from the snippet of the card image, I'm using perceptual hashing. When the card is detected in YOLO, I compute its pHash value from its image, and compare it with the pHash of every cards in the database to find the match. This process has a speed of O(n * m), where n is the number of cards detected in the image and m is the number of cards in the database. With more than 10000 different cards printed in MTG history, this computation was the first bottleneck. For the 50ms increment per detected card mentioned above, majority of that time was spent trying to subtract two 1024-bit hashes 10000+ times - that's more than 10^10 comparisons right there! |
|---|
| | | |
|---|
| | | First, there were some overhead that was coming from the implementation of the library. The following is the elapsed time for subtracting pHash for all 10000 elements in pandas database: |
|---|
| | | |
|---|
| | | | hash_size | elapsed_time (ms) | |
|---|
| | | |---|---| |
|---|
| | | | 8 | 23.01 | |
|---|
| | | | 16 | 25.72 | |
|---|
| | | | 32 | 33.38 | |
|---|
| | | | 64 | 65.98 | |
|---|
| | | |
|---|
| | | If you plot them using (hash_size)^2 and elapsed_time, you get almost a linear graph with a huge constant y-intercept: |
|---|
| | | <img src="https://github.com/hj3yoo/mtg_card_detector/blob/master/figures/6_time_plot_1.png"> |
|---|
| | | |
|---|
| | | Where is this fat constant of 22.4ms coming from? Well, we'd better look at how the [Imagehash library](https://github.com/JohannesBuchner/imagehash/blob/master/imagehash/__init__.py#L67-L72) deals with subtraction: |
|---|
| | | ``` |
|---|
| | | def __sub__(self, other): |
|---|
| | | if other is None: |
|---|
| | | raise TypeError('Other hash must not be None.') |
|---|
| | | if self.hash.size != other.hash.size: |
|---|
| | | raise TypeError('ImageHashes must be of the same shape.', self.hash.shape, other.hash.shape) |
|---|
| | | return numpy.count_nonzero(self.hash.flatten() != other.hash.flatten()) |
|---|
| | | ``` |
|---|
| | | The code flattens both hashes before comparison. You might think, "How slow is that going to be?" Apparently fair amount. |
|---|
| | | ``` |
|---|
| | | a = np.ones([1, 1024], dtype=np.bool) |
|---|
| | | start = time.time() |
|---|
| | | for _ in range(10000): |
|---|
| | | if a is None: |
|---|
| | | raise TypeError('Other hash must not be None.') |
|---|
| | | if a.size != a.size: |
|---|
| | | raise TypeError('ImageHashes must be of the same shape.', self.hash.shape, other.hash.shape) |
|---|
| | | a.flatten() |
|---|
| | | a.flatten() |
|---|
| | | end = time.time() |
|---|
| | | elapsed = (end - start) * 1000 |
|---|
| | | print('%f' % elapsed) |
|---|
| | | ``` |
|---|
| | | |
|---|
| | | The execution time of that code snippet on average is 11.65ms, which is slightly over half of 22.4ms of constant delay. That's a lot of time that can be cut out. |
|---|
| | | By pre-emptively flattening the hashes and using the hash subtraction's code (yes I know it's not a good OOP design, but this is too much of a tradeoff), that constant time can be cut out significantly: |
|---|
| | | |
|---|
| | | | hash_size | elapsed_time (ms) | |
|---|
| | | |---|---| |
|---|
| | | | 8 | 9.9 | |
|---|
| | | | 16 | 11.54 | |
|---|
| | | | 32 | 18.55 | |
|---|
| | | | 64 | 45.79 | |
|---|
| | | |
|---|
| | | Furthermore, turns out that hash size of 16 is sufficient enough to distinguish each cards in most of the case. Halving the hash size further knocked down 7-9ms, as you only need to compare about quarter of the bits compared to hash size of 32. |
|---|
| | | |
|---|
| | | ------------------ |
|---|
| | | |
|---|
| | | The other bottleneck is a something unfortunate. Turns out feeding the image through YOLO network consumes a constant 50 - 60ms per frame. Remember the processing time of (65+50)ms above? Yeah, that's where the 65ms is coming from. |
|---|
| | | |
|---|
| | | As hilarious and ironic it is, I would have to remove the network entirely to speed up the program... |
|---|
| | | **(((Facepalm into another dimension)))** |
|---|
| | | The program still works by replacing neural net with contour detection |
|---|
| | | |
|---|
| | | ## Oct 13th, 2018 |
|---|
| | | |
|---|
| | | Cleaning up everything to wrap up this project for now. If I can figure out how to move from bounding boxes of overlapping cards [(notes)](https://github.com/hj3yoo/mtg_card_detector#oct-4th-2018), I may come back to upgrade the project in the future. If you have any suggestion regarding this issue, please don't hesitate to let me know. |
|---|
| | | |
|---|
| | | Thank you for reading all the way up to here. Hope this project has helped you in some way. |
|---|

